Add a standard part to the library
Reuse vendor parts, fasteners, and other reference geometry by copying them into the repository's library folder. Library files are tracked but read-only reference — they appear in BOMs and can be referenced by assemblies, but they're never checked out or edited in place. See Files and locations for how the library bucket works.
Two kinds of source
You can copy reference parts from either:
- A local folder — a Design Library, a network share, a downloaded McMaster export, etc. Local folders are remembered per machine (they're not shared with the team).
- A Git repo — a GitHub repository of standard parts (a company library, an FRC parts repo, any public repo). Git sources are set up once by an admin and then appear for everyone on the repository. See Set up a shared Git library source.
Either way, GitM copies files in — it never moves or links them.
Prerequisites
- You are signed in and the Files tab shows your repository.
- For a local source: the files already exist on disk. For a Git source: an admin has added it in Settings (below), and your sign-in token can read that repo (public repos always work).
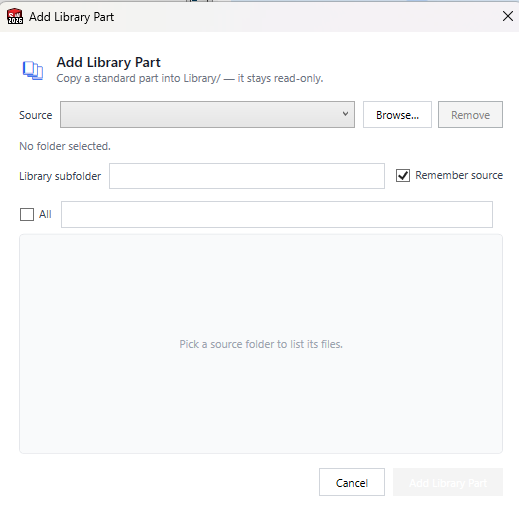
Open the Add Library Part dialog
Either:
- In List view, open the ⋯ menu at the right of the toolbar and click 📚 Add Library Part, or
- In Tree view, click the + on the Library group header.
Copy files in
- Pick a source. The Source dropdown lists your saved local folders and any shared Git sources (marked (Git)). Or click Browse… to choose a local folder on the spot. GitM lists the files it finds; use the search box to narrow them.
- Name the library subfolder. Files are copied into
Library/<that name>/, keeping related parts grouped. (For a Git source the name is fixed to the source's name.) - Select the files you want with the checkboxes (or Select all).
- For a local folder you browsed to, leave Remember source ticked to keep it in the dropdown next time (saved on this PC only). Git sources are always remembered (they're shared).
- Click Add Library Part.
If a file with the same name already exists in that library subfolder, GitM asks once:
- Yes — replace the existing copies.
- No — skip them and add only the new files.
- Cancel — do nothing.
Expected result
- The selected files are copied into
Library/<source name>/and appear in the Library tree group (and, since library parts are part of the working set, directly in the List view) with a REF badge and "Reference · read-only" status. - They are tracked in LFS like other reference parts. To publish them to the team, check them in (they're batch-only — included in Check In All or a snapshot) — no lock needed.
Set up a shared Git library source
An admin (or owner) defines Git sources once, and they appear in everyone's Add Library Part dropdown.
- Open Settings → Team & Sharing and scroll to Library Sources (Git).
- Under Add a source, either click Load and pick a repo from your account, or type a query and Search public repos and pick a result.
- Give it a Library name (the
Library/<name>/subfolder) and, optionally, a Branch and a Subfolder within the source repo to limit what's offered. - Click Add source, then Save. The source is written to the shared
.gitm/library-sources.jsonand reaches the team on their next pull.
The same list can also be managed from GitMCloud (Settings → Team & Sharing) — but the actual
copy into Library/ happens in the GitM add-in. LFS-stored parts are resolved automatically.
Notes and limitations
- Local sources are per-machine; Git sources are repo-shared (admin-managed).
- Bringing in parts is copy-once — GitM does not auto-update a library part when the source repo changes. To refresh, run Add Library Part again and choose Yes — replace.
- Private Git sources must be repositories your sign-in token can read.
- Library files are read-only by design.